The struggle often gets the best of us stick grinding for the last few stars in Genshin Impact’s Spiral Abyss. If you’re running low on time and need some quick resources, we’ve got you covered. Here are the best teams and strategies for the current Spiral Abyss Floor 12 in Genshin Impact.
Current Abyss cycle ends on:
April 30
Best teams and strategies
Suggested teams for first half:
- Ganyu – Venti – Shenhe – Kokomi
- Neuvillette – Kazuha/Venti – Furina – Charlotte
- Tartaglia – Kazuha – Bennett – Xiangling
The first two chambers feature multiple waves of mobs. The smaller mobs are all vulnerable to crowd-control, so I recommend Venti, Kazuha, or Sucrose if you have them built. I also recommend a strong healer, since many of the enemies in the first half can hit quite hard and the Husks punish you for having a shield.
Suggested teams for the second half:
- Navia – Zhongli/Albedo/Chiori – Bennett – Xiangling
- Yoimiya/Hu Tao – Xingqiu/Yelan – Zhongli – Bennett
- Tighnari – Fischl/Yae – Nahida/Dendro Traveler – Zhongli
- Noelle – Gorou – Yun Jin – Furina
The second half consists of boss chambers, encouraging teams with high single-target damage. The third chamber requires either blunt attacks or Geo damage to deplete a Geo shield, so Geo characters like Zhongli are strongly encouraged.
Blessing of the Arrowgale Moon
After triggering Swirl, your entire team will receive a 20% DMG buff to their Normal, Charged, and Plunging Attacks. This effect stacks up to three times, though there is a slight delay in how often you can gain stacks. This blessing is quite helpful as long as you have an Anemo team member and a traditional on-field DPS. It’s a great blessing, and you shouldn’t need to go too far out of your way to take advantage of it.
Floor 12 Chamber 1

First Half
Wave 1: 2x Large Dendro Breacher Primuses, 1x Pyro Abyss Mage
Wave 2: 2x Fatui Operatives
Second Half
Wave 1: Jadeplume Terrorshroom
Tips
The Breacher Primuses can easily kill you if you don’t have a strong shielder or healer. It’s also easy to accidentally take self-damage from Burning, especially if both Primuses manage to surround you. I would try to avoid Pyro and bring a strong defensive teammate. The Operatives can apply a Bond of Life with certain attacks, preventing you from receiving healing. They are both Venti-able though, so you can bring Venti or any crowd-controller to push them around.
The Jadeplume Terrorshroom has high Dendro RES, but it’s possible to brute-force your way through with a very well-invested Dendro DPS. Pyro attacks will cause it to summon minions, while Electro attacks will cause it to go berserk before stunning itself. You don’t need to bring Pyro or Electro though; just use whatever highest-DPS team you have.
Floor 12 Chamber 2
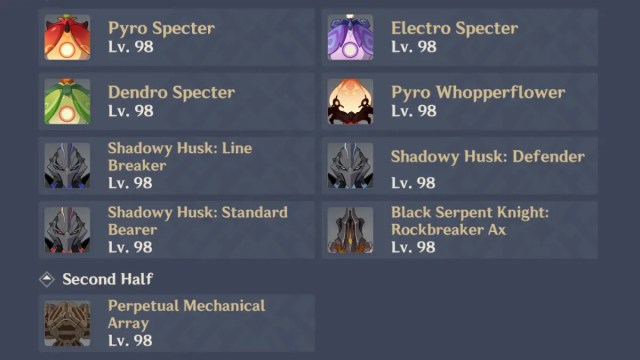
First Half
Wave 1: 2x Pyro Specters, 2x Electro Specters, 2x Dendro Specters
Wave 2: 3x Pyro Whopperflowers
Wave 3: 3x Shadowy Husks, 1x Rockbreaker Serpent Knight
Second Half
Wave 1: Perpetual Mechanical Array
Tips
Crowd-control is key in the first half. The Specters and Whopperflowers are all vulnerable to crowd-control. Venti, Kazuha, or Sucrose will help keep them grouped together. All of the Husks in Wave 3 have a mechanic that punishes shield-wearers, and the Rockbreaker will try to shield its friends. Try to bring a healer rather than a shielder, and keep everyone grouped together. Freeze teams work great here.
The Perpetual Mechanical Array will become invulnerable at low health, summoning several ruin machines as it tries to recover. Find the one ruin machine with a ring of golden symbols around it, and defeat that one to stun the main boss. The main machine core will then become vulnerable, letting you deal damage to it with whatever team you find most comfortable.
Floor 12 Chamber 3
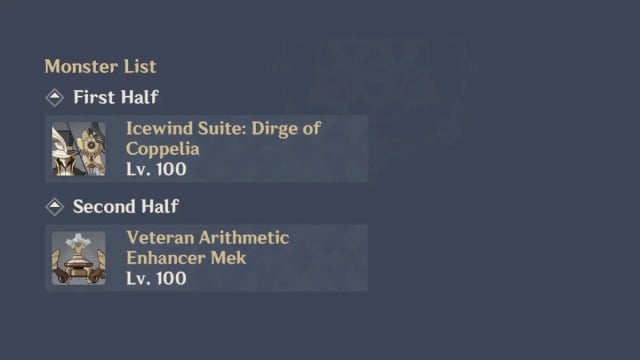
First Half
Wave 1: Icewind Suite: Coppelia
Second Half
Wave 1: Arithmetic Enhancer Mek
Tips
When you start Coppelia’s fight, her partner, Coppelius, will move to the outside of the arena and send waves of Cryo damage towards you. Both meks are capable of significant damage, so try to bring a strong shielder or healer and keep an eye on where Coppelius is. This boss resists both Anemo and Cryo.
The second half is a souped-up version of the Local Legend Arithmetic Enhancer Mek in the open world. Use Geo damage or blunt attacks to break its Geo shield, then deal damage with any element while the shield is down. Geo teams or Claymore users are great here.