


World of Warcraft: Forever reimagines the experience that started it all, so Blizzard brings two decades of lessons to help you rediscover Azeroth in a way you’ll never forget. WoW: Forever comeS with enhanced visuals and prettier character models, so you’d want to give this new “vibe” the modern settings they deserve.
Maybe you want less clutter in your UI, or you need even more ways to track what’s going on. Before you get a new add-on, you should check if there’s a setting that covers your needs.
Table of contents
The four commandments of settings doubt

So you know you want to change the WoW: Forever settings to make it a more enjoyable experience. But when you press Escape, you’re greeted with a lot of options.
Sometimes we’re just not sure if adjusting a small setting could break the experience. In moments of doubt, follow these commandments:
- Reset in-game options at any time: Go to Battle.net and go to the Forever page. Click the cogwheel icon beside the “Play” button, and it takes you to “Settings.” Find “Game Settings” and click “Reset In-Game Options.” This will bring your game back to your default settings.
- Default is your friend: Most settings in Forever can reset to default. Feel free to play with any of those settings, as you can reset the game if you break something.
- Remember your initial settings: If possible, try to intuitively take note of what the default settings “generally” are before you edit them. It’s always a safe move to adjust one setting at a time, especially for categories with a lot of adjustables.
- Test with Task Manager: The best way to know if a setting actually breaks your PC is to test it with Task Manager open in another window. Any change that spikes your PC load means it’s probably not a good idea.
With that out of the way, let’s go through some of the best settings you could choose for your WoW: Forever experience:
Choose these for your graphics
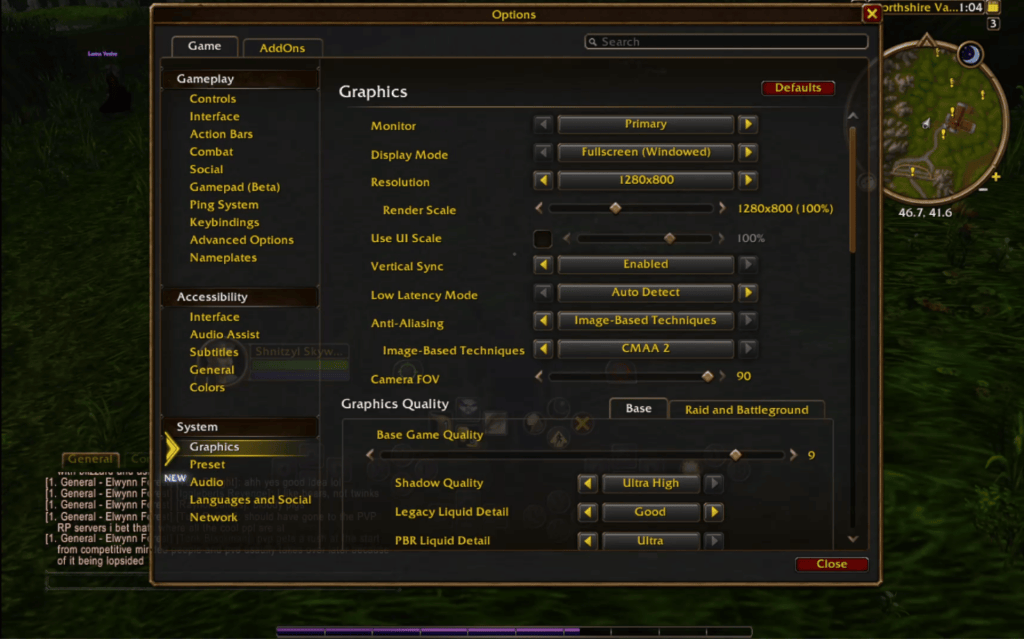
One of the highlights of the WoW: Forever reveal was the makeover the dev team gave to the overall visuals, and there’s a way to enjoy it without breaking your experience.
Graphics
- Resolution: Don’t go for the default resolution they set up for you. Instead, choose the proper resolution you actually have.
- Anti-Aliasing: If you have a powerful computer, compare Image-Based Techniques with Multisample Techniques.
Graphics Quality
- Base Game Quality: The game chooses a default value for you, so use that as a baseline. Increase this incrementally until you lag, so the point before that is your maximum threshold. The point between the default and the threshold is your acceptable midpoint, and use that to find your “true” Base Game Quality.
- Compute Effects: These affect things like volumetric fog, so set this higher if you want to appreciate that kind of depth effect in the environment.
- Texture Resolution: This is where you’d want to increase the number so the details are crisper.
- Secondary Lighting: Forever really improved its lighting, especially during dawn and dusk and in areas where there are pockets of light, so go for a higher setting here.
- View Distance: Ideally keep this high so you can see further ahead.
- Environment Detail: Similar to textures, keep this high if you want to get more immersed while touring the outdoors.
- Ground Clutter: If you have a good GPU, increase ground clutter so you can see grass and foliage much clearer instead of just a flat surface.
- Raid and Battleground Game Quality: You can have a separate set of quality options for Raids and Battlegrounds. If you have a powerful PC, you can keep this the same as Base. But if you’re managing your performance, you can have these multiplayer-heavy gameplay modes at a lower quality than the core experience.
Advanced
- Texture Filtering: Keep at 16x Anisotropic to be on the safe side.
- Graphics API: Use DirectX 12 default, then switch to DirectX 11 if you experience a lot of lag.
- Max Foreground FPS: Keep at 120 FPS for base testing, then lower to 60 FPS if you’re struggling.
- Max Background FPS: Keep at 60 FPS, then lower to 30 FPS if you’re struggling.
- Target FPS: The target FPS you’re shooting for. Just leave this be since Max Foreground FPS and Max Background FPS are more specific modifiers.
- Contrast: You might find that a higher contrast can help highlight a lot of the details in the game.
- Gamma: The game is surprisingly a bit darker by default, so you can increase Gamma to two or three so it’s not as bright but not too dark either.
Compatibility Settings
- Optional GPU Features: Only toggle if you have a powerful GPU.
- Async Resource Creation, Multithreaded Rendering, Advanced Work Submit: Turn it off if the base game is lagging, but there’s a risk of reduced FPS.
The holy Keybinds to go for
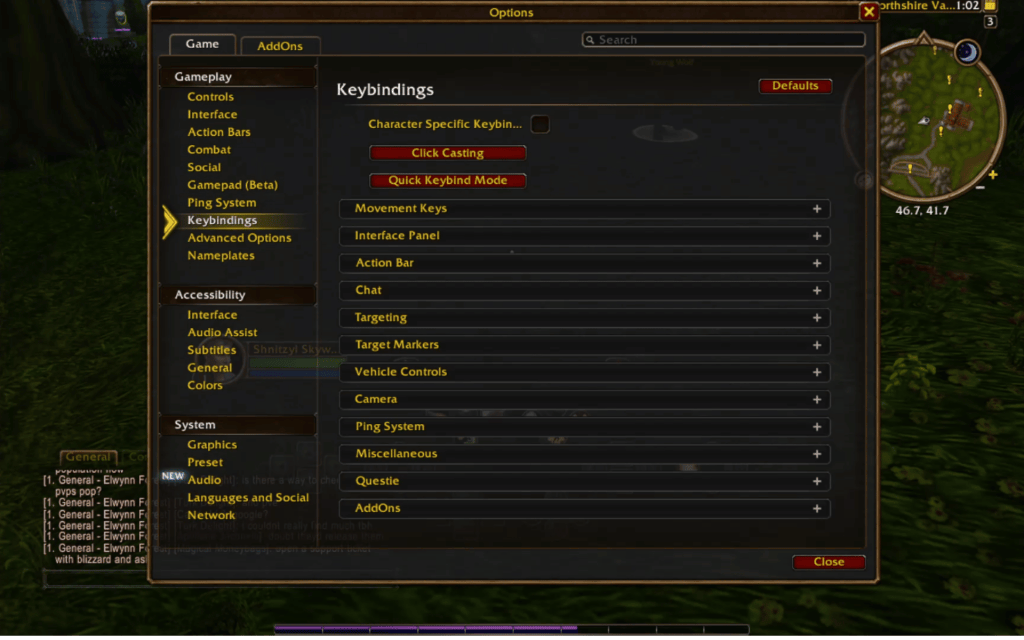
Your keybinds form a crucial part of your core WoW: Forever experience, especially since they facilitate what you can do in combat encounters. By default, you have the number keys for spells, and anything else you can click on the screen. But if those are still slow (they probably are), then consider these tips for keybinds:
- Keybinds depend on your other buttons: If you use a special mouse with keys on the side or a dedicated mini-keyboard for your spells, your best spells should be there.
- Use modifiers for special conditions: Aside from solo keys themselves, you can use them with modifiers (Ctrl, Shift, Alt) to create completely separate keybinds, which you can dedicate for specific situations such as Stances, Wild Shapes, actions outside combat, and so on.
- Mouse wheel for repeated fast actions: Any action or spell that happens quickly and reloads fast enough can be locked to the mouse wheel, as these will likely be things you will do on the regular.
- Q, E, R, F for essentials: Lock down your most relevant actions or spells to these keys since you can access them with your left hand the fastest.
- Z, X, C for secondaries: Likewise, any secondary-priority actions can be reserved for these keys since you can still reach them with your left hand but with some complexity.
The most relevant Gameplay settings
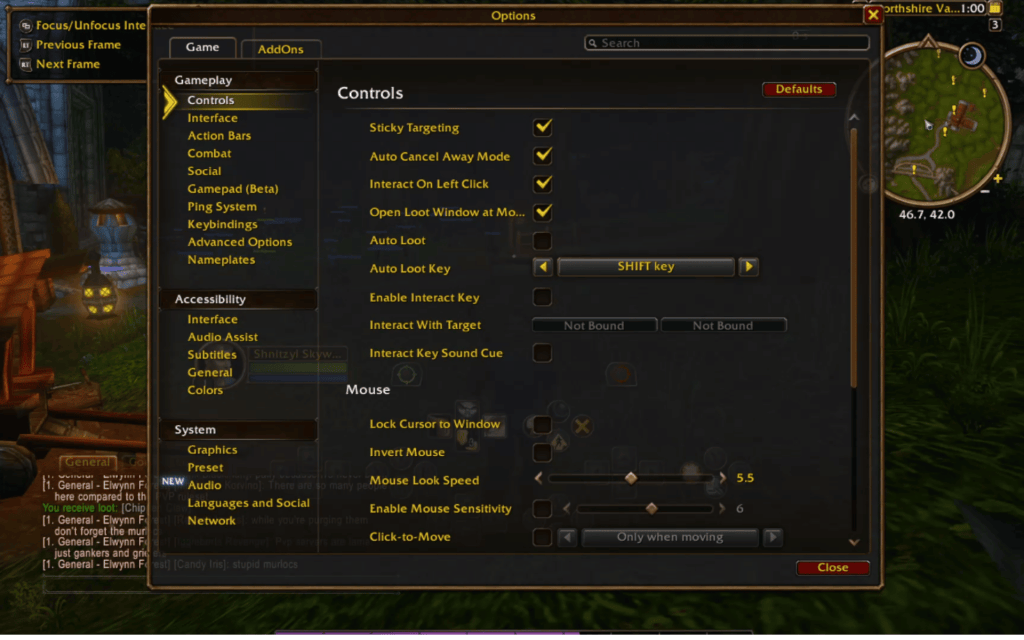
Everything under Gameplay represents some aspect of WoW: Forever that can affect the way you interact with the game’s elements. Pay attention to these specifics:
Controls
- Sticky Targeting: Normally, you deselect a tagged target when you click somewhere else in the game. This setting ensures your target stays clicked even if you interact with something else.
- Auto Loot: You might want to loot everything from a corpse. The seconds you save with this instead of just clicking each item can be important for farming.
- Camera Behavior: This affects how you interact with the camera. By default, the camera is locked behind your character as you move. Some prefer this as Never, so you can rotate the camera freely and see what’s happening around you.
Interface
- Status Text: By default, status bars in the game are just visual bars. This setting lets you choose between numbers, percentages, or both.
Combat
- Personal Resource Display: This toggles whether you see your health and resource values below your character model. You can set this to Only in Combat, so you only see your stats when fighting.
- Target of Target: This lets you see the target of the creature you’ve just clicked, which is perfect if you want to figure out who everyone else is fighting or which enemy is targeting which ally
Nameplates
- NPC Names: You can choose which NPC names you prefer to see upfront, which could range from friendlies only, enemies only, quest-related only, or some combination of those.
- Nameplates: You can customize how nameplate elements will appear in the game, such as nameplate information, cast bar Information, anything about aggro display, as well as buffs and debuffs.
Read what’s behind the latest news in gaming (with a bit of snark) by subscribing to the Destructoid Checkpoint newsletter!
Check the Advanced Options first before getting add-ons
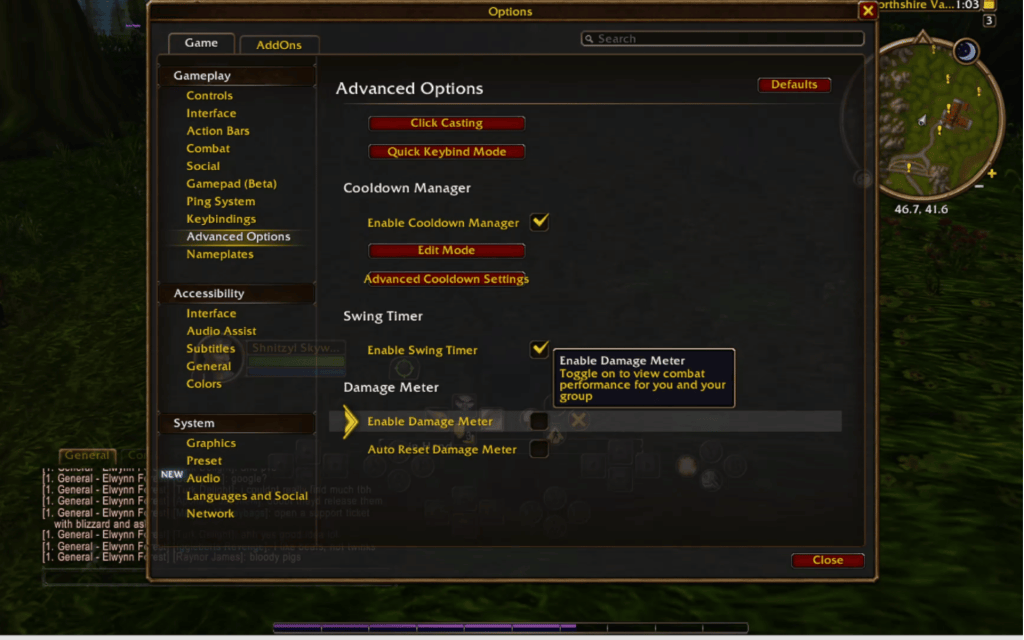
No one will blame you if you already have a list of add-ons in mind before you log into Forever. But the WoW title does offer new options that might strike your fancy without having to download external assists. When you open the settings, head to Advanced Options and check out these additions:
- Do you need to check your cooldowns? Enable the Cooldown Manager under Advanced Options. Switch to Edit Mode to modify the placements of your key spells and cooldowns. Customize via
/cdmin the chat. - Do you need to keep track of damage? Enable Damage Meter under Advanced Options. Go to Edit Mode to move, resize, and customize what it can track for you.
- Do you want to know when your next auto-attack lands? Enable Swing Timer. This shows a bar that fills up whenever you wait for an auto-attack.
- Do you want to cast spells by clicking on a target? Go to Gameplay and then Advanced Options or Keybinds to enable Click Casting. The next time you hover over a spell list, you can start binding it to a combination of mouse-and-modifier presses (click, right-click, shift-click, etc.).
Adjust Edit Mode for your UI tweaks
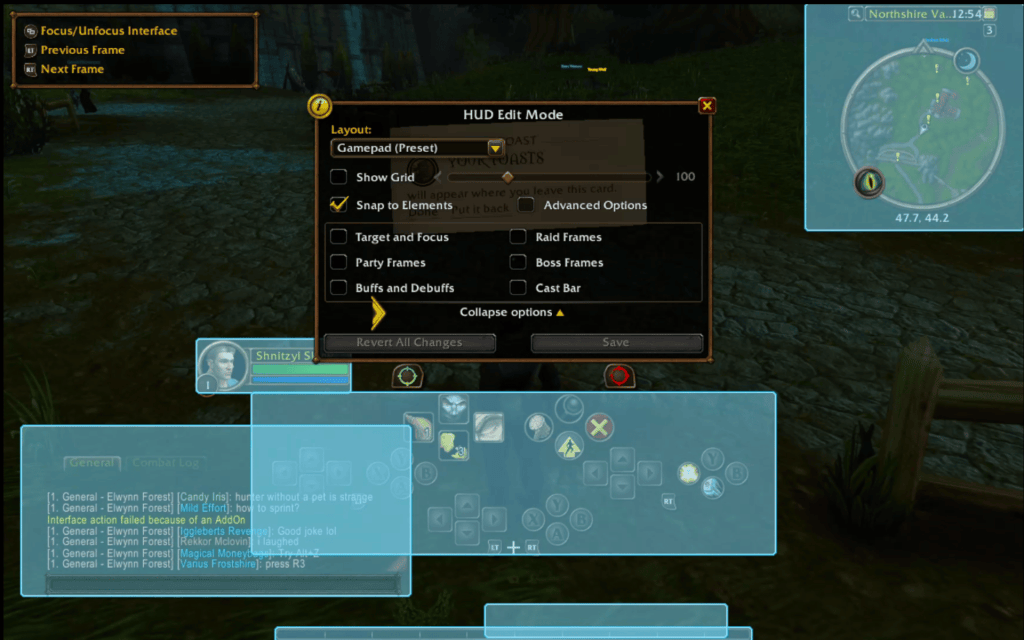
Thanks to Edit Mode, you can also adjust where you want to see your UI elements while playing the MMO. The default is usually serviceable for most players, but if you want things just right, then Edit Mode does the heavy lifting for you. You can adjust most HUD elements via Edit Mode, so you can tweak it based on how you want to play the game.
Controller fans rejoice
It’s probably not news to a lot of players that there is a way to play WoW with a controller, and we have ConsolePort and other add-ons to thank for that. But Forever is the official instance in which Blizzard is adding native controller support to WoW, so now it’s much easier to just sit back up, grab a joystick, and explore Azeroth without hunching in front of the PC.
Setting up the controller
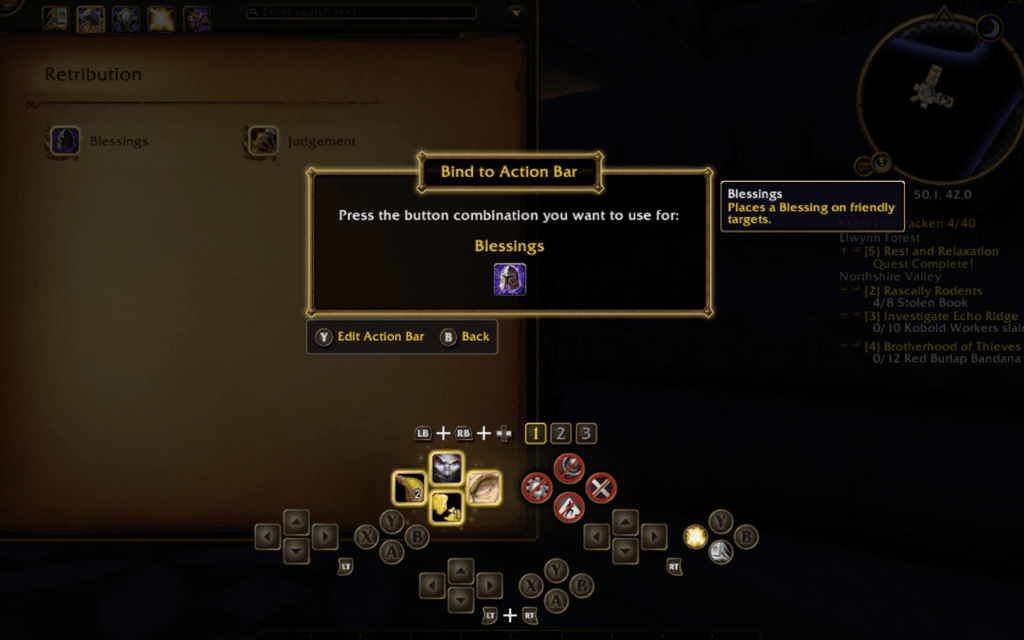
Switching to your controller is rather straightforward. Just go to the game menu, find Options, then Gameplay. You should see Gamepad in there with a checkbox. Tick that setting to switch to controller input, and untick it to switch back to keyboard-and-mouse.
When you make the switch, you’ll see a cluster of buttons confined to the middle of the screen. Its base settings use the Xbox controller as base and are as follows:
- Bumpers for targets: Use the LB and other keys to cycle through friendlies and the RB with other keys to cycle through hostiles. You can also press them together to cycle through HUD elements:
- LB+RB+B: Open the backpack.
- LB+RB+Y: Manage buffs.
- LB+RB, up arrow: Open quest tracker.
- LB+RB, down arrow: Access chat (still needs the keyboard to type).
- LB+RB, left or right arrow: Switch to another fully bindable action bar.
- Triggers for commands: Similar to other controller-based MMOs, commands are assigned to triggers. Press either LT, RT, or both to cycle through three sets of button commands.
- Face buttons for common actions: The bare face buttons are already reserved for basic actions. For Xbox, this is:
- X: Auto-attack, interact
- Y: Inspect
- A: Jump
- B: Cancel
- LT+RT, right joystick: Zoom in and out
- Settings: Your controller’s settings button opens the main menu. Use the face buttons to cycle through other menu parts. Use the right joystick to point at a setting to open it.
- Almost everything is bindable: Whenever you hover over something with the controller, check if it has a Bind button. That usually lets you bind it (whether it’s an item, a consumable, or a spell) to any of the buttons.
- There is a gamepad legend: When you switch to the gamepad, you will see a gamepad legend on the upper-left of the screen. Once you get the hang of the basics, you can turn this off in the settings.
Try these changes for your gamepad experience
Switching from the keyboard to the gamepad can be very jarring at first, especially when you need to get used to HUD navigation on top of binding actions to new keys. But once you get the hang of it, consider adjusting these as well:
- Use Compact Action Bar: By default, you will see all button configurations of your controller. Go to Edit Mode, then click the Action Bar (with the buttons) to reveal its settings. Toggle Use Compact Action Bar so only the base eight buttons (without clicking triggers or bumpers) are seen, and the trigger/bumper-based binds are only revealed as you hold them.
- Bare arrows for common actions: By default, the arrow keys aren’t bound to anything, so bind them to your most common actions. Add your potions and other combat consumables.
- Bumper combos for one-offs: Bind any “one-offs” or things you use but not regularly to the bumper combos. Think hourly global cooldowns (buffs, auras) or your Hearthstone—basically things you use, but not as often.
- Turn on voice chat: Go to Battle.net and click Settings to access voice chat. Configure your device there. Head back to WoW, and you should see a Voice Chat setting where you can configure your push-to-talk or open-mic preferences. This is only usable with parties, raids, guilds, or communities, but this is way better than reconnecting the keyboard in team play.
Play World of Warcraft: Forever on PC and macOS.


