Much like its predecessor, The Legend of Zelda: Tears of the Kingdom features Hyrule besieged by many enemies and bosses. The new Depths introduce formidable foes like the Frox. To defeat it, Link must use bombs or arrows to break its defenses. Here’s a map showing all 39 Frox locations.
All Frox Locations in Tears of the Kingdom
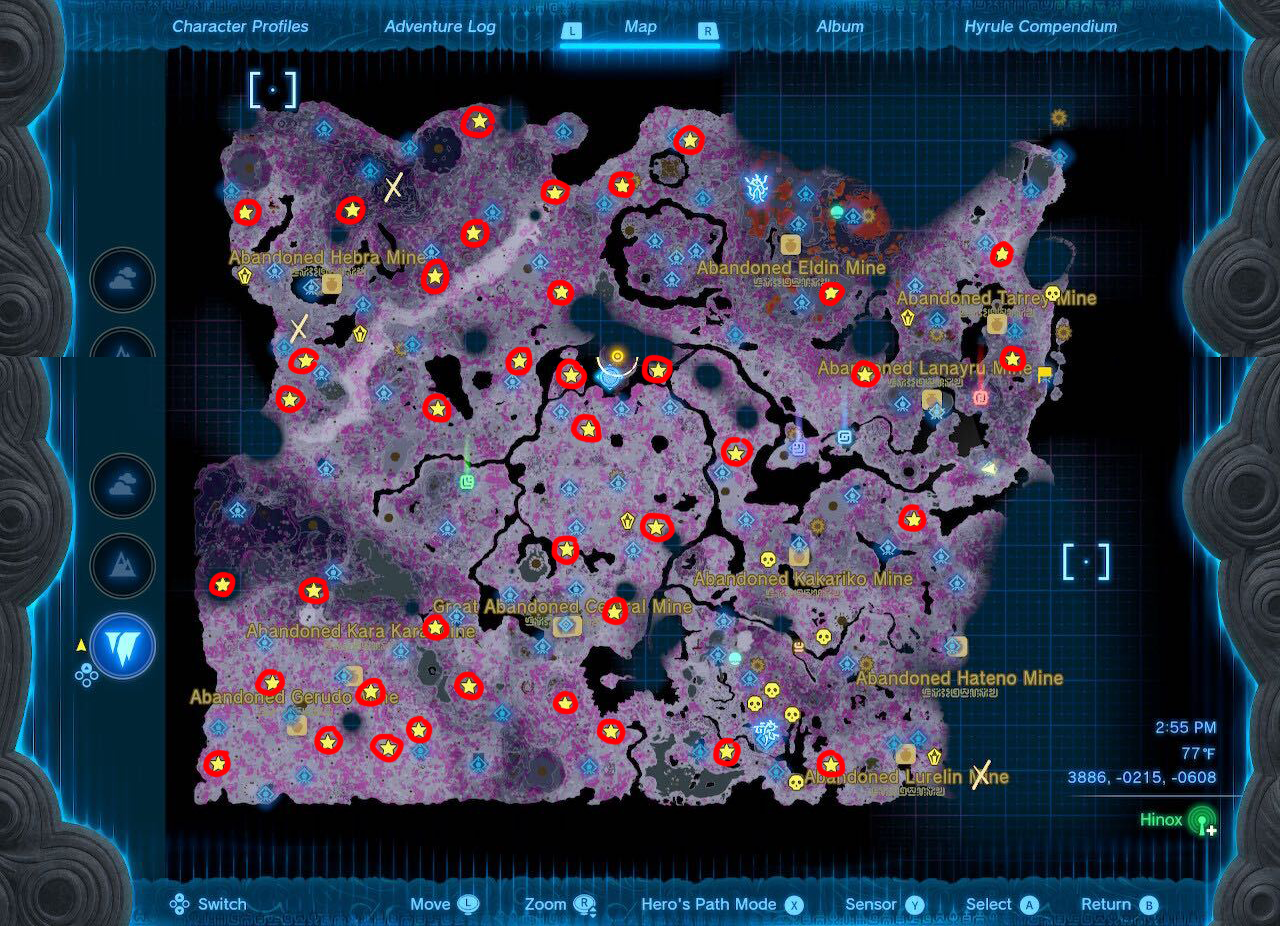
Froxes can only be found in the Depths. Fortunately, they’re extremely easy to find since they’re out in the open. All you’ll need to know is their coordinates. Here are all of the Frox locations in TotK:
1: Southeast of the Takaruk Lightroot, and southwest of the Kegopa Lightroot, you’ll find an Obsidian Frox. It lives in the clearing below where Trotter’s Downfall sits on the surface map. Its coordinates are (3036, -0867, -0512)
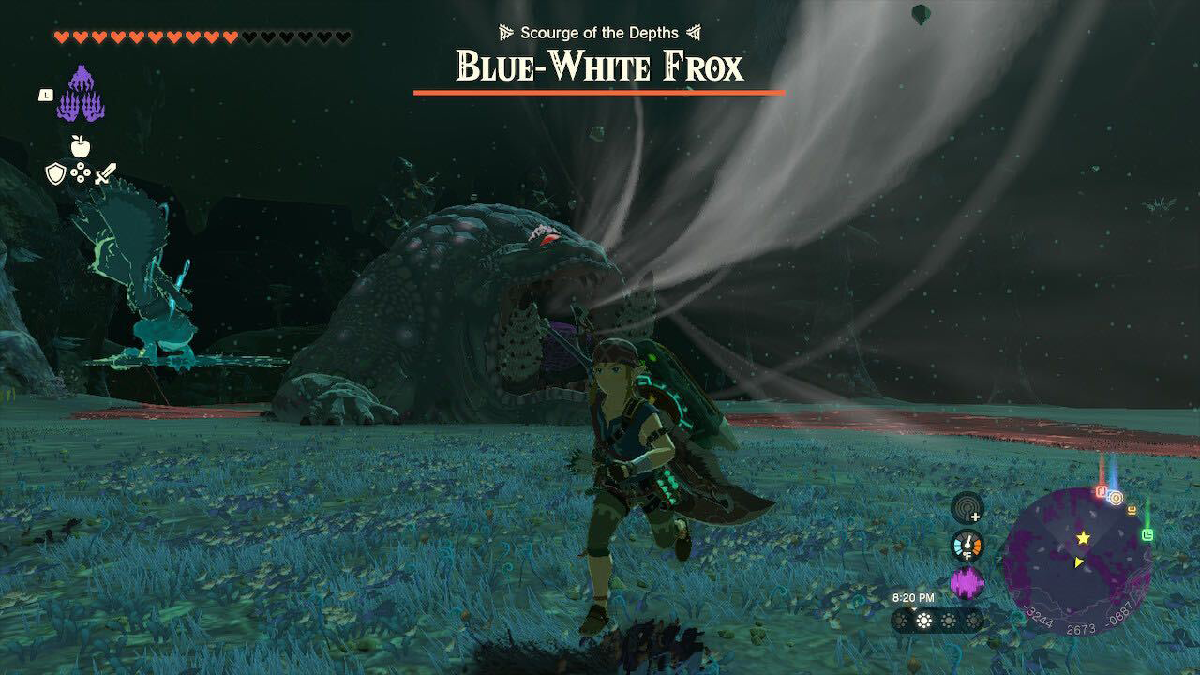
2: Heading northeast of the Korakut Lightroot, and southwest of the Nojoj Lightroot, you’ll see a Blue-White Frox. The narrow passageway caused by the Hylia River and the Lanayru Wetlands will make it easy to spot this creature if you’re flying a Hoverbike. Its coordinates are (1005, -0085, -0465)
3: You can find another Blue-White Frox just west of the Ancient Observation Deck and Tuft Canyon Mine. It’s directly north of the wall that makes up Clarnet Coast and Aris Beach on the surface. If you’re fast traveling, your best bet is to travel to the Mimufis Lightroot and head southwest. Its coordinates are (2135, -3519, -0447)
4: Further west from this Frox, you’ll find another Obsidian Frox. This one is located directly east of the Kohsustu Lightroot. It’s so close you can see it from the Kohsustu Lightroot. Its coordinates are (0738, -3378, -0478)
5: A normal Frox can be found northeast of the Nikoshi Lightroot. You can reach it more easily if you go directly north from Pappetto Grove. Its coordinates are (-0331, 3117, -0463)
6: There is another Frox just northwest of the previous one. It’s located southeast of the Hyla Canyon mine, in the middle of four Zonai platforms. Its coordinates are (-0816, -2905, -0515)
7: Another Frox can be found northeast of the Kawatik Lightroot. However, you’ll need to do some climbing to get to it. It’s in a clearing to the right of where Spectacle Rock sits on the surface. Its coordinates are (-1851, -2712, -0580)
8: Another Frox can be seen directly north of Amakawis Lightroot. It’s so close you can see it without having to leave the Lightroot, though just nearby is an enemy camp, so you’ll need to be careful. Its coordinates are (-2456, -3257, -0470)
9: You can find another normal Frox directly east of the Amakawis Lightroot. However, you won’t be able to see it from there. You’ll have to do a little of walking. It rests in a clearing at coordinates (-2682, -3354, -0442)
10: The next Frox sits northeast of the Gataharak Lightroot, and southwest of the Mihcihic Lightroot. Its coordinates are (-3392, -3241, -0467)
11: If you head northeast of the Michcihic Lightroot, you’ll be able to find an Obsidian Frox. The quickest way to reach it is from the Abandoned Kara Kara Mine and the Tatayam Lightroot. Head southeast to coordinates (-3059, -2668, -0461) for a safe viewing angle.
12: You can find another Obsidian Frox at the bottom left corner of the map, directly below Gonatoyrim Lightroot. Just head directly south, and you’ll run into it at coordinates (-4717, -3428, -0469)
13: The next Obsidian Frox is located northwest of the Gonatoyros Lightroot and the Abandoned Gerudo Mine. It sits directly to the left of the Zonai platform, north of the mine. Its coordinates are (-4045, -2564, -0491)
14: If you make your way to the Umamustor Lightroot, you can glide down to the Blue-White Frox to the southwest. Its coordinates are (-3551, -1544, -0805)
15: Head a litter further west to the Stamayam Lightroot, and you’ll be within jogging distance of another Blue-White Frox. This creature resides in a clearing north of the Lightroot, and its coordinates are (-4709, -1308, -0940)
16: Another normal Froz lives north of where Spectacle Rock is in the overworld, just southwest of the Jadukakar Lightroot. It sits in between the Kimakarut Lightroot and the Jadukakar Lightroot. However, you’ll have to round the wall that makes up the Koukot Plateau if you want to reach it from there. Its coordinates are (-2184, -1949, -0584)
17: Heading east of the Great Abandoned Central Mine and southwest of the Nuzimak Lightroot, you can find a normal Frox. It sits in a clearing, and its coordinates are (-0320, -1851, -0462)
18: Northwest of the Nogukoyk Lightroot, just past a Zonai materials platform, you’ll find another Frox. It’s also southwest of the Nihcayam Lightroot, east of the top left corner of Lake Kolomo. Its coordinates are (-0759, -1131, -0470)
19: Northwest of the Stakijat Lightroot is another Frox. Though you can’t see this one from the Lightroot itself, a short walk will spawn it in for you. Its coordinates are (0259, -0944, -0478)
20: You can find another Frox southeast of the Gadoshi Lightroot, and southeast of the Sinoyk Lightroot. They’re about the same distance away, so either one is an optimal starting position. You’ll find the Frox northwest of the top left wall of Lookout Point, with the coordinates (-0576, 0188, -0465)
21: There’s a Blue-White Frox in the depths underneath the leftmost island in Hyrule Castle Moat. However, the only way to that part of the Depths is through the Hyrule Castle Moat West Chasm. Once you dive there, head into the middle of the island, and you’ll run into the Frox, it’s tough to miss. Its coordinates are (-083, 0792, -0465)
22: Northwest of the Kawakanis Lightroot, you’ll find an Obsidian Frox. You won’t be able to see the Frox from the Lightroot, but a short walk should put it right in your sights. Head to coordinates (-1314, 0983, -5451) to get a decent view of the area.
23: To the east of the Rhoam Canyon Mine, you’ll find another Obsidian Frox. This one requires you to take a bit of a walk, as it sits comfortably in the clearing underneath Ludfo Bog, and within the depths of the Seres Scablands. Its coordinates are (-2321, 0444, -0549)
24: Nestled directly between the Koro-Nui Lightroot and the Kataki Lightroot is a Blue-White Frox. It sits in the middle of the Gloom patches between both Lightroots and is out in the open, so you can’t miss it. Its coordinates are (-3647, 0941, -0552)
25: Just south of the previous Frox’s location, northeast of the Sasag Lightroot, you’ll find another Blue-White Frox. Its coordinates are (-3849, 0616, -0574)
26: Heading north on the map to the Nupisoyuat Lightroot, you’ll want to climb up and head southeast. You’ll find a large clearing and another Blue-White Frox. Just be sure not to jump into the wrong arena, as just north of it is a boss battle with a Colgera. Its coordinates are (-4454, 2720, -0667)
27: For the next Blue-White Frox you’ll want to head to the Worihas Lightroot. From here, you’ll want to head northeast, towards the pit. However, you’ll need to do a lot of climbing to get there faster. Once you do make it to the top, glide down and you’ll find the Frox at (-3258, 2644, -0888)
28: South of the Aduon Lightroot, you’ll find yet another Blue-White Frox. Much like the last Frox, you’ll have to do some climbing to reach it. However, it’s right next to an Ascend Point, where you can get out of the depths without fast travel. Its coordinates are (-2308, 2031, -0715)
29: You can find another Blue-White Frox southwest of the Muihcoro Lightroot. It’s a short walk with no climbing or jumping, so you’ll be able to find it fairly quickly. Its coordinates are (-1778, 2496, -0667)
30: West of the U-Nazohso Lightroot is once again a Blue-White Frox. Getting to it is as simple as heading west, and you’ll find it at coordinates (-1696, 3468, -0677)
31: The next Frox is an Obsidian Frox. It can be found by heading to the Yisuayam Lightroot, and gliding down from the ledge on the Northeast. However, be careful; there’s an enemy camp right there, so you’ll have to outrun them. Its coordinates are (-0998. 2814, -0619)
32: Another Obsidian Frox can be found southeast of the Yoyoyuik Lightroot, and northwest of the Netamnet Lightroot. It’s also very close to the Elma Knolls Chasm. Its coordinates are (-0866, 1793, -0545)
33: A Blue-White Frox can be found right at the bottom of the Hyrule Castle Moat East Chasm. Down in this singular cell of the Depths, it’s very easy to come across. The Apapes Lightroot also resides down there, its coordinates are (0253, 0887, -0473)
34: You can find an Obsidian Frox northeast of the Nikakik Lightroot. It’s also southwest of the Drenen Highlands Chasm. If you’re heading there via the Nikakik Lightroot, you’ll need to do a hefty amount of climbing. Remember, Ascend is your best friend! Its coordinates are (-0179, 2912, -0616)
35: As you reach the Katenim Lightroot, you’ll find an Obsidian Frox to the southeast. It’s so close, you should be able to see it right from the Lightroot’s location. Its coordinates are (0493, 3457, -0592)
36: From the Kawamit Lightroot, there’s a normal Frox to the northeast. However, since this location is close to Death Mountain, and by proxy the Fire Temple, you’ll need some Flamebreaker Armor if you don’t want to burn up. It’s a quick climb from the Lightroot. Glide down into the clearing and you’ll find the Frox. Its coordinates are (2030, 1691, -0755)
37: You can find an Obsidian Frox south of the Anonisik Lightroot, and northwest of the Uinoj Lightroot. However, you’ll have to climb both if you want to make it to the boss. Its coordinates are (2545, 0844, -0501)
38: Just south of the Kawikatisar Lightroot, you’ll find another Obsidian Frox. To reach it, it’s as simple as heading south until you run into it. Its coordinates are (4125, 1093, -0687)
39: The final Obsidian Frox is southeast of the Akinatanis Lightroot, and directly within the East Akkala Plains Chasm. If you’re diving from the Surface and looking for a fight with one of these baddies, this is the chasm to do it. From the Lightroom, it’s a short climb and runs until you’re face to face with it. Its coordinates are (3978, 2208, -0469)

Differences between Frox, Obsidian Frox, and Blue-White Frox
There are three variations of Froxes: regular Froxes, Obsidian Froxes, and Blue-White Froxes. The colors denote the enemy’s strength, with Blue-White Froxes having significantly more HP than regular Froxes. Obsidian Froxes are an intermediate between regular and Blue-White Froxes. The enemies also have distinct drops (Frox Fang, Obsidian Frox Fang, Blue-White Frox Fang), which may be relevant if you want a specific monster part. Regardless of how hard they are to defeat, you can use the same strategy against all three varieties.
How to beat Frox in TotK

Start by keeping your distance from the enemy, giving you more time to dodge its attacks. To defeat a Frox, you must destroy all the rocks on its back. This can be tricky to do unless you stun the Frox first. There are a few ways you can do this.
- Shoot its eye with an arrow. Elemental arrows like Fire, Lightning, and Bomb Arrows with an area-of-effect are the best for this.
- Shoot/throw a bomb flower into its mouth while it’s inhaling. (Be sure to run so you don’t get swallowed yourself!)
- Drop a time bomb Zonai device while it’s inhaling.
Once the Frox is stunned, run up its arm onto its back and smash the ore nodes. Blunt weapons like clubs, hammers, and maces are more effective at breaking rocks. After a while, the Frox will throw you off, at this point, you can repeat stunning it, running onto its back and breaking the stones.


