Just git gud, kupo!
With yesterday’s 5.00 patch for Monster Hunter: World dropping the new Behemoth hunt and Final Fantasy XIV crossover equipment, I plowed through the main content like a breeze. Until special assignment He Taketh It with His Eyes, that is. I have never failed a quest so much since farming tempered Teostra for rewards.
While there are a handful of useful tips, ultimately it comes down to how well-informed everyone in your party is versus how informed you can be. By now, everyone should know about the Ecliptic Meteor and its one-hit-KO power, but it really can’t be understated how enormous its impact range is.
Party composition is helpful but not required
At first I thought the devs were just pushing DPS, healer, and tank roles in order to drum up hype as a crossover quest, but actually having people fulfill those roles is a massive boon for your hunt.
While Behemoth may not be a tempered elder dragon, he hits very hard and can make health upkeep demanding unless someone is sporting wide-range. Likewise, lance, gunlance, and even heavy bowgun with shield can help a party keep consistent damage by drawing aggro (or Enmity if you prefer), but it’s worth noting any consistent damage on Behemoth’s face will draw Enmity.
I accidentally drew Enmity after Beyblading too many times across Behemoth’s back and you can also draw it by unloading a bunch of rocks on his face with your slinger if you want. After all, tanking isn’t always just blocking damage — it can also be evading damage.
While most players dismiss quality-of-life skills like earplugs, I personally like tremor resist. Behemoth can produce tremors that shake you long enough that a follow-up attack is inescapable.

It’s a lot more MMO then you think
Classic Monster Hunter fans pride themselves on recognizing telegraphed attacks and patterns, but Behemoth announces all its channeled spells on the side feed similar to events like turf wars or falling boulders. It helps to glance over to the right to make sure you don’t miss important information that should dictate your next action. You can see Behemoth casting Charybdis, Meteor, Comet, and of course the Ecliptic Meteor. Just be wary that Behemoth’s physical moves aren’t broadcast the same way.
Dragging spells safely
Speaking of Charybdis or Comet, those two spells in particular have big tells that hover over their intended target for a few seconds before being cast. Charybdis is basically Kushala Daora’s persistent tornadoes and the number one problem with them is that mindless dragging can create a wall of tornadoes which will obviously complicate the battlefield.
If Charybdis is being channeled, you’ll notice a whirlwind build around you. Your best course of action is to sheath your weapon and drag it over to the edge of the room so that it doesn’t become a problem later on. You can also spam flash pods in order to interrupt the channel. Even if Behemoth builds a resistance to the stun, he’ll never be immune to it, meaning you can potentially deny every Charybdis.
As for comets, a red flash begins to spark around you until a rock just drops on your head. Rather than drag those across the map, comets need to be strategically placed. You’ll want to position them so that you can quickly run for cover from the Ecliptic Meteor but not be in the Behemoth’s path of destruction because they are destructible.

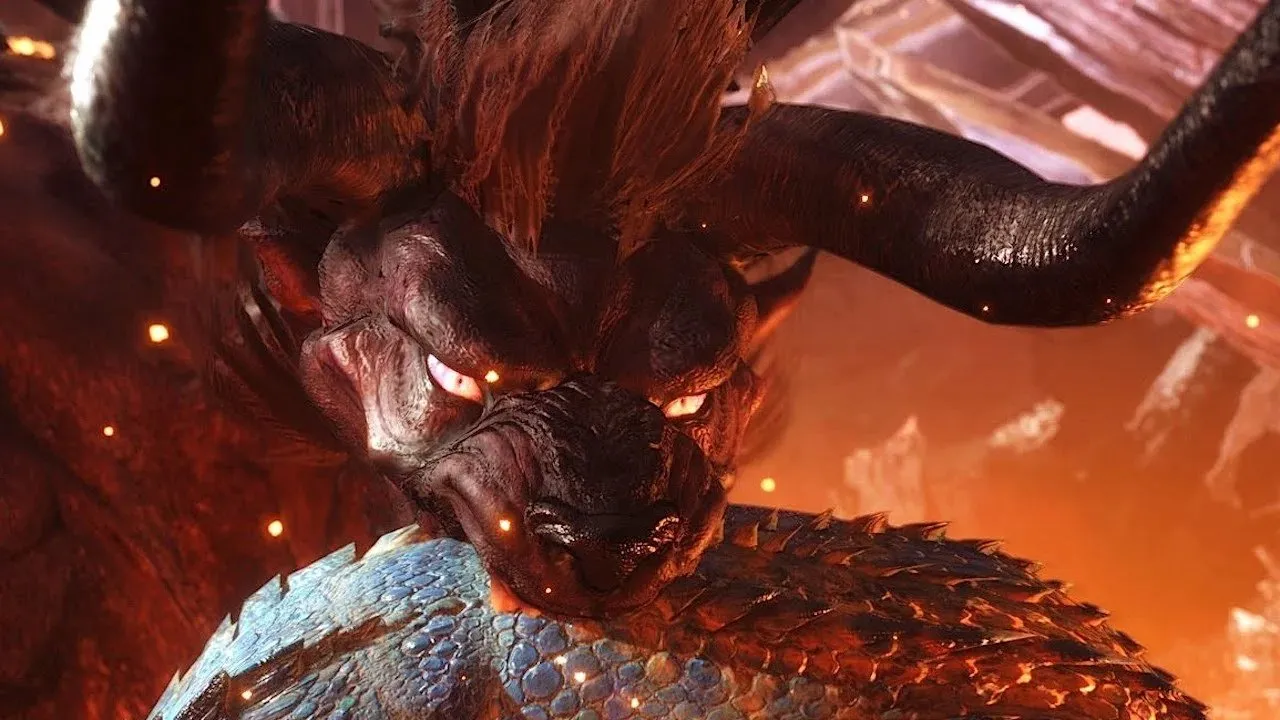
The Behemoth’s weak zones
Obviously, the face and tail are its biggest weak points. Both are very high up though, so only weapons with reasonably high striking arcs can hope to hit them reliably. Luckily the forearms are easier to hit though whether they qualify as a weak zone for Weakness Exploit is unclear. The back legs can be hit in a pinch but don’t yield much damage. The entirety of Behemoth’s torso however is rock hard and will make even white sharpness bounce.
Strangely, the devs played up Behemoth’s weakness to water but the in-game guide states he has a three-star weakness to dragon and only a two-star weakness to water. He’s also fairly susceptible to all forms of status, which is a nice consolation knowing Behemoth can and will crush you under its paw.
And as long as I’m bringing up his big, meaty paws, be aware Behemoth can inflict bleed, so bring Astera Jerky for that.
Yes, Ecliptic Meteor will one-shot you
Every single thing you’ve done before to mitigate damage does not work against the Ecliptic Meteor. Guard Up? No. Temporal Mantle? No. Farcaster? Disabled. Guts? That was a trick question, nobody uses Guts. The point is, Ecliptic Meteor will ruin your life and every life marginally related to you. In some cases, even the camp site won’t protect you as it’s within the impact range (but being inside the tent will save you).
While you do need to strategically drag the incoming comet so that they’re close but not too close to the heavier action, there is one other way to survive the Ecliptic Meteor and that’s the Final Fantasy XIV jump emote that you earn in the quest that introduces Behemoth, The Legendary Beast.
I wouldn’t say its easy to do since I tried it too late. My guess is that while you do disappear from the map and become invulnerable to damage, there is a brief amount of travel time as you jump up, which is how I carted. From the look of videos on Twitter, you need to time it just as the meteor appears on the field because by the time it’s visible, it’ll quickly hit the ground in the same time it takes for you to completely disappear with your jump. So while there’s a learning curve to this extremely risky move, it may be your only option since the fallen comets can be destroyed as collateral damage in your hunt. If that’s the case, you’re better off trying to survive with a jump or go out like a champ by using the despair emote.
Other than that, you need to pay attention to the red glow it creates, as it indicates the impact site. When you know where the impact site is, you don’t strictly need to be right behind a fallen comet. You only need the comet to break the line between you and the impact. The game will help you recognize this by bathing the bad side of the comet in a red light, so all you need to do is to stand on the dark side of the comet. Just keep this in mind if you think you’re too far away from one as you can still be safe.
I still haven’t cleared this quest. I might just farm The Legendary Beast since it gives enough parts to actually craft some stuff. But as for He Taketh It with His Eyes, I haven’t found a team yet that could survive off three carts since Behemoth’s HP is set for multiplayer and does not scale for a solo run. Hopefully if more people catch on to his tactics, there will be more successful hunts soon.


