Time to learn about some shapes in Tears of the Kingdom
If you’ve just made the brave jump back into Hyrule in Tears of the Kingdom, Jiosin Shrine will likely be one of the first Shrines you find. It’s located directly to the south of Lookout Landing, so you’ll likely stumble on this one without even trying.
That said, for this stage of the game, Jiosin Shrine can be quite a brain teaser, especially if you struggle with visualizing shapes in your head. Here’s what you need to do.

Room 1 of Jiosin Shrine
When you enter Jiosin Shrine, you’ll see a door in front of you across a long chasm. Naturally, this means you’ll need to find a bridge. Look to your left and you’ll see a mostly empty room. Head inside.
You’ll find the bridge you need, but its middle segment is perpendicular to both of its ends. Fortunately, your solution here isn’t too hard. On the wall, you’ll see a hole in the shape of an X. Just pick up the bridge with your Ultrahand ability and arrange it into a matching shape so it slides cleanly through. You can see how we did it above.
Once you slide the bridge through, plop it on the chasm in front of you and jump over the gap created by the middle segment.

Room 2 of Jiosin Shrine
Here’s where things get trickier. Pass through the door and you’ll enter a second puzzle box. The room to your left will lead to the exit, but you’ll need the Z-shaped block contained in the room to the right.
Right off the bat, enter the room to your right and use your Ultrahand to slide the block through the hole in the wall. A few vertical and horizontal rotations will do the trick.

At this stage, you can easily grab an optional chest. In the center hallway, place your connected blocks in the hole as pictured above. This will form a natural staircase that you can climb to open the chest. You’ll find a Hasty Elixir inside.

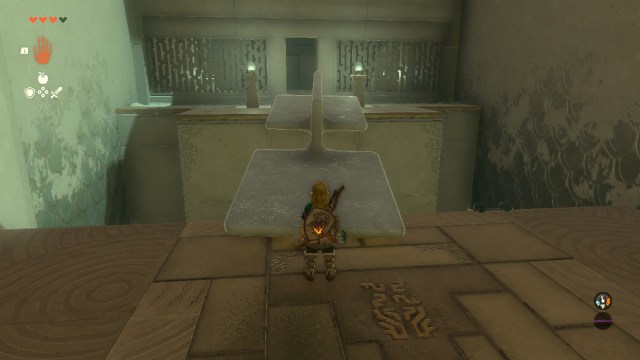
After this step comes the hardest part. In the room leading to the exit, there’s a hole in the wall in the shape of two overlapping diamonds. For the solution we found, this turned out to be somewhat of a red herring. Arrange the blocks in a diamond shape so they’ll fit through the top part of the hole. Slide the first segment in, and then move the entire piece diagonally so the second segment slides through the same spot. You can see what this looks like in the screenshots below.


Afterwards, place the block down so it forms a staircase similar to how you grabbed the optional treasure chest. Check out the shape it should take below.

Climb up the steps, and you’ll finish Jiosin Shrine!


