
As you fight your way up into higher difficulties, you will start getting Tactical and Secondary Objectives to find and complete in Helldivers 2. These optional quests award in more experience points and Requisition Slips, so they’re worth tracking down. Here’s how to find them.
Tactical Objectives are optional objectives your team can complete for additional awards. They’ll appear as part of your Briefing strategy as blue icons on a mission map. Secondary Objectives are additional Tactical targets that appear once you touch down. They’ll also appear as blue icons, but only on your mini-map as you get near them during the mission.
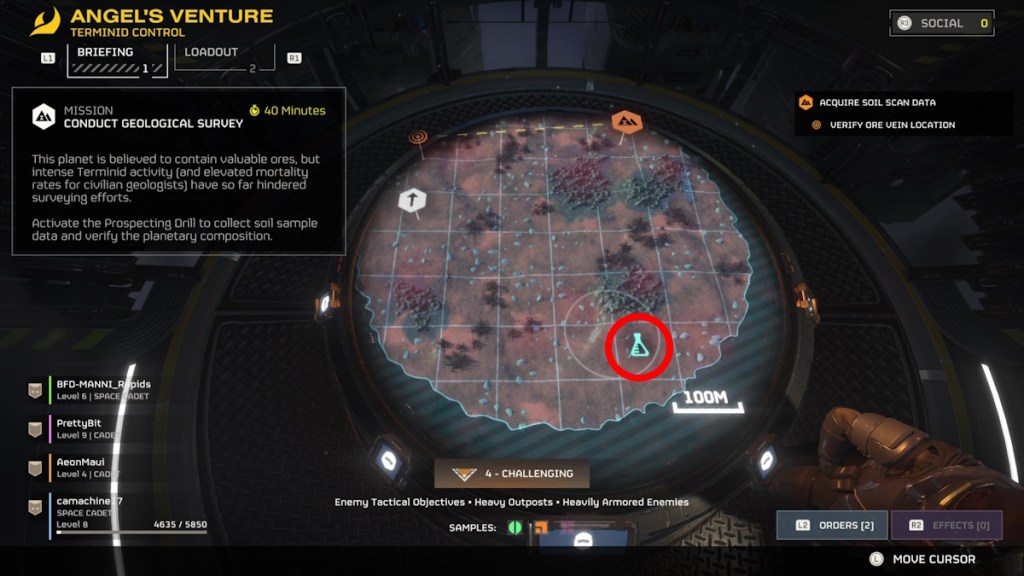
Keep in mind that you won’t always be able to see a clear map ahead of the mission.
Other ways to find Secondary Objectives in Helldivers 2
Secondary Objectives don’t all show up on the map. The Tactical Objective appears during the Briefing segment, allowing you to track it directly on the mini-map once you’re in the game. But you should explore the area fully to discover more objectives.
It pays to be thorough. I started a mission recently that had me destroy a research station as a Tactical Objective. But just around the corner was a Terminid Spore Spewer. Suddenly, I had more meat on the menu.
Rushing through the Main Objectives typically is a quick way to get some cash and experience, but mission timers can be fairly long. If you have 40 minutes, don’t let it go to waste.
When you’re near a Secondary Objective, you’ll see the icon you need to follow show up on the compass near the top of the screen.
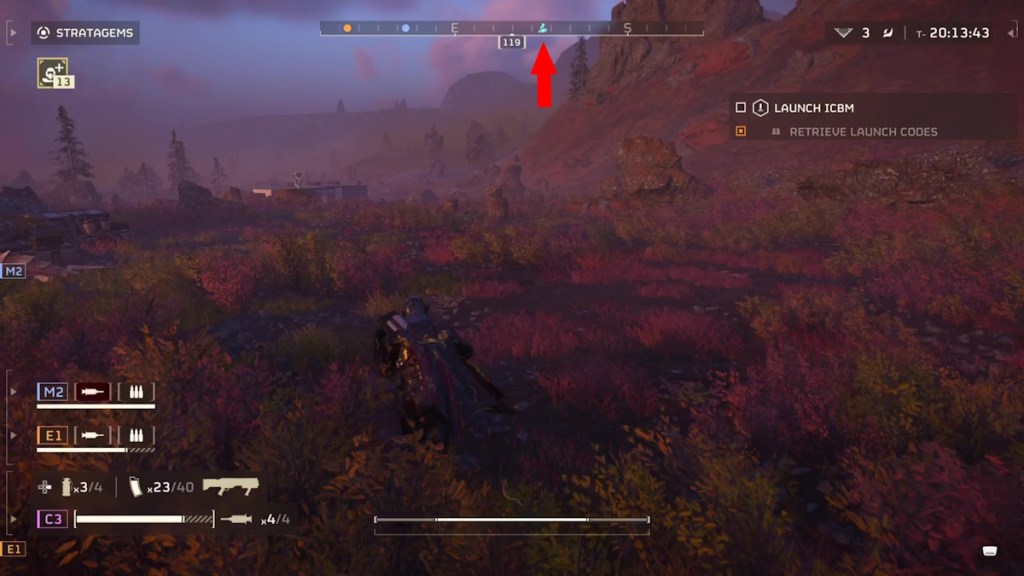
The game will tell you how to complete the objective once you’re close enough.

What kind of Secondary Objectives are there?
Tactical and Secondary Objective types are varied. Some will have you blow a thing up. In those cases, you can use an orbital Stratagem and call down a Hellbomb. An objective may have you upload the data of an escape pod, while another will task you with powering on a radar station that reveals map details.
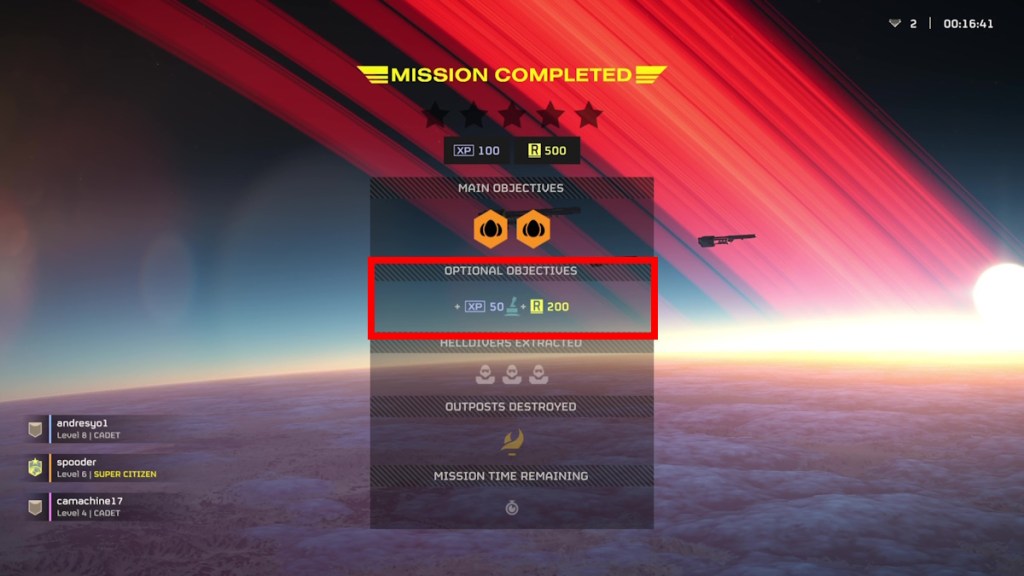
No matter what Secondary Objectives you’re given, completing them offers rewards at the end of a mission. You can earn a good chunk of additional experience points and Requisition Slips, so it’s certainly within your interest to seek them out.
All Secondary Objectives in Helldivers 2
There are 16 Secondary Objectives in Helldivers 2. The first three in the table below are among the most common Optional Objectives.
Here’s our list of all the Secondary Objectives in Helldivers 2 so far:
| Objective | Description | Completion Effect | Terminid or Automaton |
|---|---|---|---|
| Upload Escape Pod Data | A crashed escape pod in the region contains valuable data. | Nothing. | Both |
| Destroy Rogue Research Station | This facility contains unpatriotically produced research data, and must be razed to the ground. Use explosives or call a Hellbomb. | Nothing. | Both |
| Terminate Illegal Broadcast | An illegal propaganda broadcast has been traced to this location. | Nothing. | Both |
| Destroy Stalker Lair | Find and destroy the Stalker Nest to stop them from spawning in the area. Use explosives. | You won’t get harassed by Stalkers in the area. | Terminid |
| Activate Radar Station | Activate the Radar Station to reveal Points of Interest and Objectives on the map. | POIs and Objectives are no longer hidden when using the map. This is one of the most important Secondary Objectives to complete. | Both |
| Activate SEAF Artillery | SEAF Artillery will provide an additional Stratagem option once activated. | The Artillery awards you an extra offensive Stratagem with five shots based on the ammo type loaded. | Both |
| Destroy Spore Spewer | Locate the Spore Spewer and destroy it using explosive munitions. | Destroying the Spore Spewer removes the fog of spores obscuring your vision in the area. | Terminid |
| Destroy Mortar Emplacement | Find and destroy the Automaton Mortar emplacements. Use explosives or call a Hellbomb. | You won’t get mortared while in the area anymore. | Automaton |
| Destroy Stratagem Jammer | Locate and raze the Stratagem Jammer that’s blocking you from using Stratagems. | You’ll be able to call in Stratagems in the area once more. | Automaton |
| Destroy Detector Tower | Destroy the Detector Tower (Eye of Sauron) in the area to end Automaton Drops after your detection. Call in a Hellbomb. | Getting detected by the tower will cause Automaton Dropships to arrive in defense. Destroying the tower stops the drops. | Automaton |
| Activate SAM Site | Locate and activate the friendly SAM Site in the area. | The SAM Site will shoot down Automaton Dropships on occasion. | Automaton |
| Destroy AA Emplacement | Find and raze the Automaton AA Emplacement so you can call in Eagle Airstrikes. | Eagle Airstrikes are now available in the proximity. | Automaton |
| Destroy Shrieker Nest | Find a Shrieker Nest and use a Hellbomb to destroy it. The Eagle 500kg Bomb may work, but it’s finicky. | No more damn Shriekers in the vicinity. | Terminid |
| Destroy Gunship Fabricator | Destroy the Gunship Fabricator using a Hellbomb. No other Stratagem will work. | Gunships no longer clog the proximity. | Automaton |
| Enemy Bio-Processors | Destroy the enemy bio-processor plants using a high explosive or Hellbomb. | Nothing. | Automaton |
| Retrieve Mutant Larva | Locate a Mutant Larva and retrieve it for “study.” The player taking the larva needs to carry it on their back. | Nothing. | Terminid |


