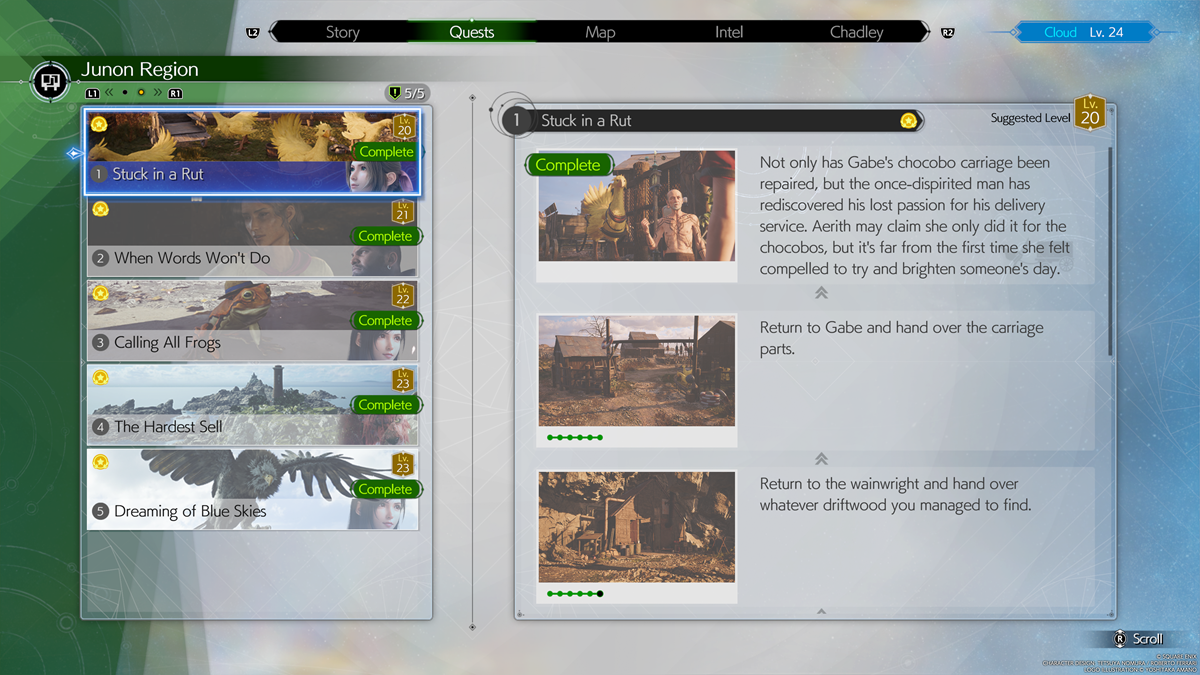
The second open-world region in Final Fantasy 7 Rebirth is Junon. There are five side quests in total available when you first reach Junon. Four of the five side quests don’t have choices that matter, but the fifth and final side quests, Dreaming of Blue Skies, has a choice you make at the end that does in fact have a correct answer. Below is a Checklist of the order in which you should do everything in terms of side quests in the Junon Region to ensure you get the best results, and below the Checklist is an in-depth walkthrough guide for each of the five side quests.
Junon Region Side Quest Checklist
- Stuck in a Rut side quest
- Proceed through the Main Scenario at Under Junon until you reach Priscilla’s Plan Main Scenario quest
- Pick up When Words Won’t Do and Calling All Frogs side quests at Community Board in Under Junon
- When Words Won’t Do (Unlocks Crow’s Nest) and Calling All Frogs side quest
- Pick up The Hardest Sell and Dreaming of Blue Skies at Community Board in Crow’s Nest
- The Hardest Sell and Dreaming of Blue Skies
- At the end of Dreaming of Blue Skies side quest, choose Bovine Meat as the Condor food choice
FF7 Rebirth: Stuck in a Rut walkthrough
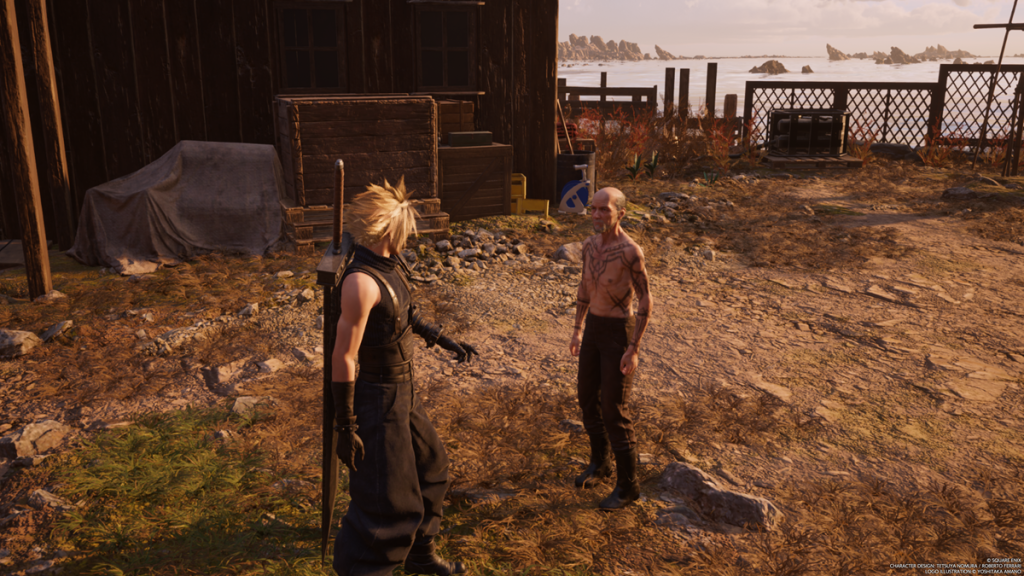
Your first side quest is to visit Gabe at Gabe’s Ranch in Junon, which is just southeast of Under Junon and just west of where you first enter the region from the Mythril Mine. Speak to the Ranch Owner (Gabe) who will start the side quest. Aerith wants to help Gabe get his Chocobo Ranch back up and running, though Cloud is a bit skeptical. In order to progress you’ll eventually have to agree to help Gabe, which starts the quest.
Your first order of business is to head to the Wainwrights Hut located just northeast of here, as you can see on the map above. In order to get up there you will need to have obtained Belle the Chocobo, as you need to use her ability to climb up walls en route to the Hut. Once there, speak to the Wainwright lying in the bed and choose to ‘Wake Him Gently’. He will give you a map that you can examine to go and find the materials he needs to construct a part for Gabe.
Gather Materials for the Wainwright
If you look at the map the Wainwright gave you, you’ll see all three parts are in the relatively same area. Let’s Fast Travel to the Chocobo Intel: Birds of the Mountain which is where you caught Belle. It’s marked as two Chocobo footprints on your map.
From here, head just north along the western coast and you will get a pop-up about following a scent with your Chocobo, as well as a red indicator to do so. Hold up on the D-Pad to have Belle sniff out the scent, then follow the blue line until she finds the buried materials. Then hit down on the D-Pad to scour the area and uncover the Dried Driftwood, the first material the Wainwright needs.
If you hit left on the D-Pad to check your notes you’ll see next we need to head to the northeast. You’ll see a house, and near it is where you will find the second material. Once again use Belle to sniff out the scent then scour in the proper location to find the second piece of Dried Driftwood.
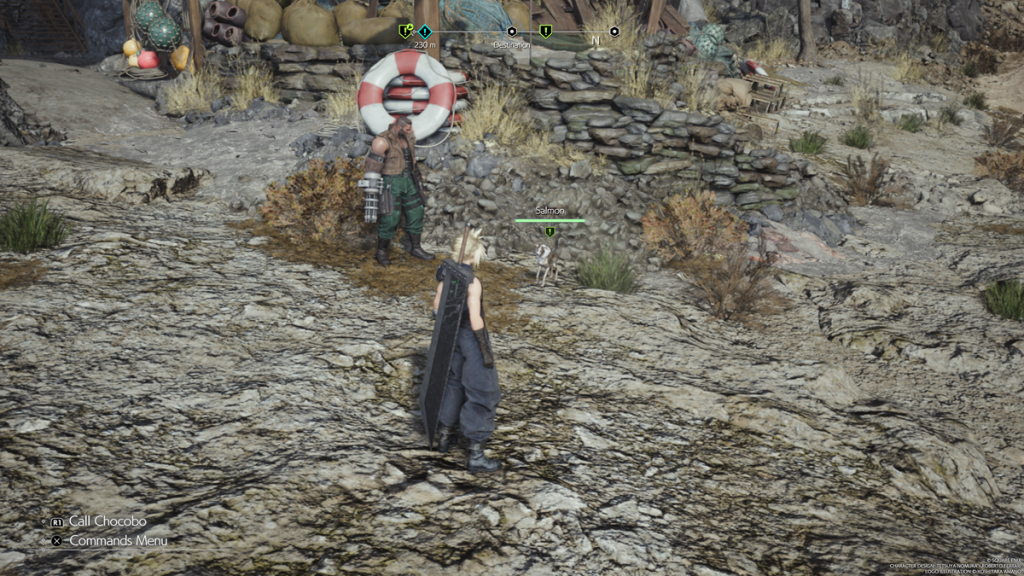
The final material is to the east, near a Junon support beam. Hop on Belle and head east until you see the Junon support beam in the screenshot above, and begin sniffing out the scent with Belle. You may have to kill a couple of flying Fleetwings nearby as Belle won’t sniff while they are around. Once you’ve found the spot, scour to get the final piece of Dried Driftwood. Fast travel back to the Wainwright’s Hut and give him the materials.
Deliver the parts to Gabe
Doing so will wake him up, then ask him for the part. He will give you the three parts of the Carriage that Gabe needs, so fast travel back to Gabe’s Ranch.
Speak to Gabe to hand over the parts that will complete the Stuck in a Rut side quest, and once again allow you to travel between the Junon and Grasslands regions via stablehands at each region’s respective Chocobo Ranch, meaning you no longer have to travel through the Mythril Mine.
You will receive the Queensguard Bangle and further deepen your relationship with Aerith by completing this side quest.
FF7 Rebirth: When Words Won’t Do walkthrough
If you opt to grab this side quest from the Community Board in Under Junon, you’ll see you can pick up the quest from Rhonda just outside the Inn. Rhonda wants you to escort her dog Salmon across Junon. Agree to the job, then fast travel to the entrance into Under Junon called Angler’s Stowage to officially begin this side quest.
Salmon will greet you with a “Woof!”, after which you can interact with him to proceed. Salmon will run ahead, so just follow behind him as quickly as you can to make sure he doesn’t get into any trouble. You’ll first encounter a couple of Fleetwings on the road, but you should make quick work of them with ease.
Just keep on following Salmon. It’s literally on the other side of Junon, as the location he is taking you to is Crow’s Nest, a settlement located near the eastern shore.
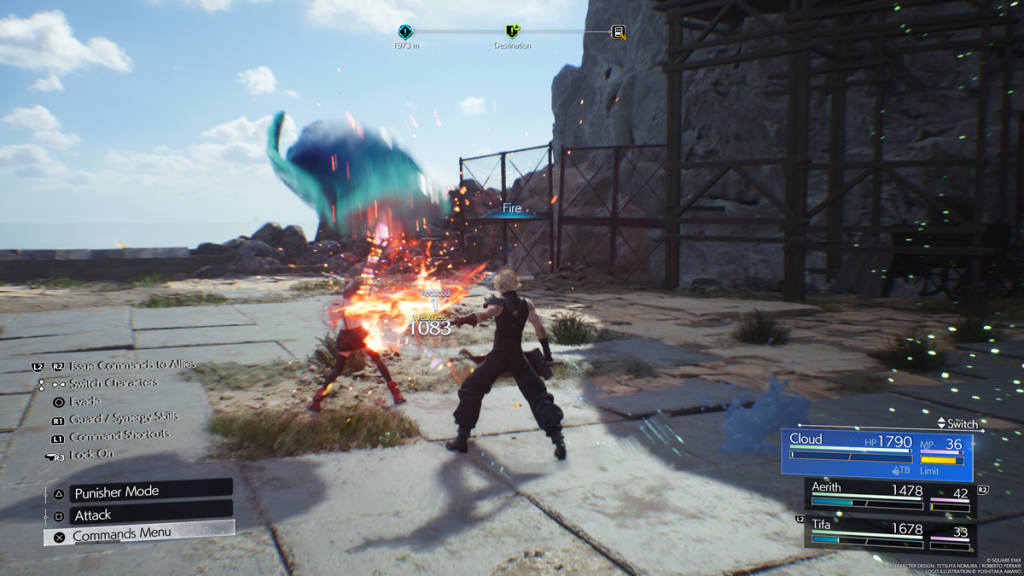
Next, you’ll encounter a Zemzellett and a couple Capparwire’s. The Capparwire’s die easily, but for the Zemzelett you will want to spam damage on it when it begins casting Wingbeat, which will Pressure it sending it to an easy Stagger and then defeat.
Your final encounter will be against two Sandstorm Drakes. You want to attack them from behind to weaken and destroy their aura, which will Pressure them. Once pressured you can quickly Stagger and then defeat them. Just be sure to dodge their attacks because too many will cause you to get Petrified.
Follow Salmon one last time and you will finally reach Crow’s Nest and complete the When Words Won’t Do side quest. You are rewarded with 3 Chunks of Mythril Ore, 2 Ruby, and 10 SP for Barrett.
FF7 Rebirth: Calling All Frogs walkthrough
This is probably the easiest side quest as it’s essentially just completing a mini-game. After you’ve picked up the side quest from the Community Board in Under Junon, head to the location marked on your map. It’s in Under Junon, down near the water near where you faced the Terror of the Deep as part of the Main Scenario. Continue around and you’ll reach an area covered in a pinkish fog. As you approach, a few uhh…frogs…will croak at you. Turns out the fog is from the nearby reactor and turns you into a frog somehow,.
First you have to fight some Ignislisk’s and Capparwire’s that are down here. You’ll be in frog form at first which means you can only use basic attacks, Bubble Breath, which heal, and the ability Leapfrog. Basically you just want to spam attack a target until you can Leapfrog and then use it to essentially wipe out an enemy in one attack.
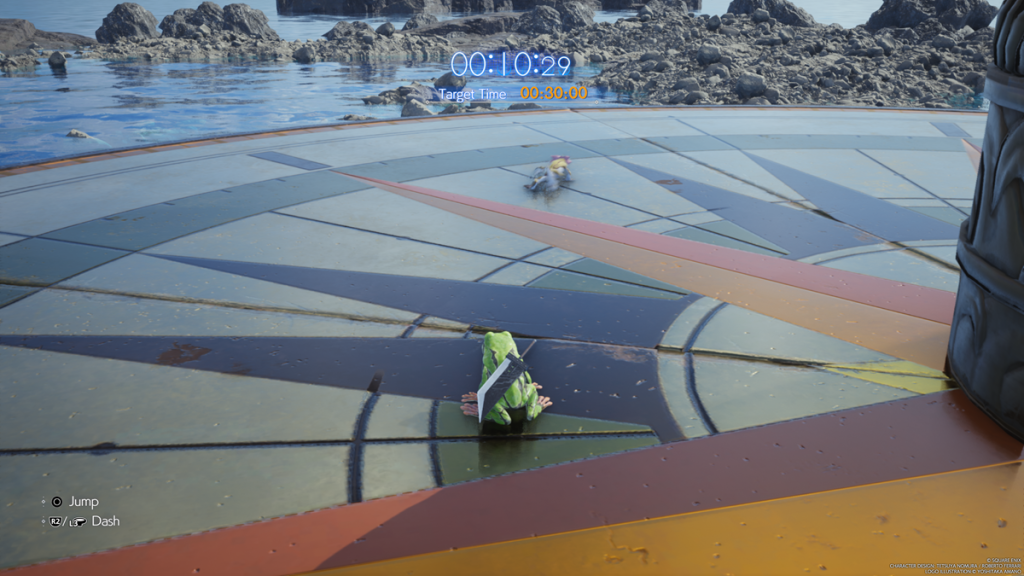
Once they are all defeated, talk to the boy Finn to progress the side quest. They now want you to participate in a fun game of there’s where they jump around on a platform as giant bars swirl around that can knock you off into the water. Sounds fun, right? Oh and you have to be in frog form to reach this fun game.
You want to try to last in the mini-game for 1:20:00, as this will unlock all three rewards which are three Enfeeblement Rings. Basically just maneuver around the platform so that you’ll only have to worry about one bar to jump at a time, and keep an eye out for the platform shaking. This means it’s about to break off, so quickly move to a section that is not shaking. The first section breaks off after 30 seconds, and the next at one minute.
As long as you last at least 30 seconds, you will technically complete the Calling All Frogs side quest.
FF7 Rebirth: The Hardest Sell walkthrough
In Crow’s Nest, speak with Toby who will tell you about a “merc” who set up at the lighthouse south of Crow’s Nest. We know who that is, right? Tell him you’ll do him a solid to start the side quest.
Head south out of Crow’s Nest all the way down until you reach a wooden bridge. Cross the bridge and you’ll see a Chocobo Stop that you can fix up right before the Abandoned Lighthouse that is decorated with balloons.
Go upstairs into the Abandoned Lighthouse to find none other than Kyrie, the “merc” from the Grasslands region. She made a theme song for her “Merc business” which happens to attract some Flan to the area. Head down and out of the lighthouse to encounter the Flans.
They are weak to spells, so just attack them to build your ATB before casting a spell like Fire on them to instantly kill them. Just don’t use Blizzard as they are immune. Several enemies will spawn as you take out previous ones, but all of the enemies in this side quest are just basic enemies you’ve encountered before., Here’s what you fight in total:
- 2 Flan
- 3 Flan
- 3 Ignilisks
- 4 Flan
- 2 White Mousse
The White Mousse’s are new and are basically stronger versions of Flans. You need to use spells to Pressure them, but using the same elemental damage types will cause them to absorb the element and do a strong counterattack. So you want to cycle through your different spells to Pressure and then stagger one at a time, then take it out.
Defeating the two White Mousse will complete The Hardest Sell side quest and get you some exp, a couple pieces of Chocobo Gear, and deepen your relationship with Red XIII.
FF7 Rebirth: Dreaming of Blue Skies walkthrough
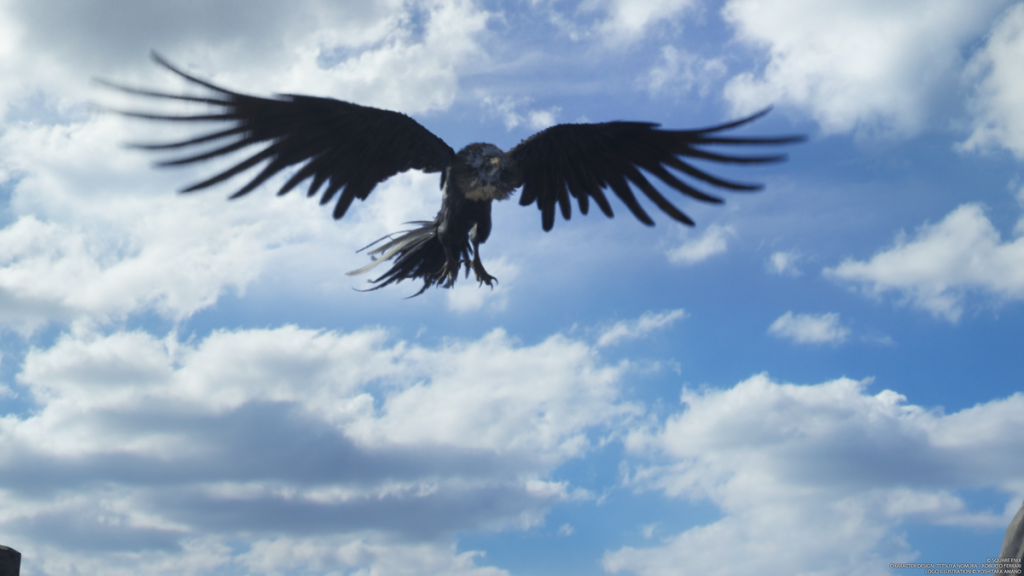
The Dreaming of Blue Skies side quest starts in Crow’s Nest, so fast travel there and head out the western exit. Head up the wooden ramp until you find the quest giver, Colin. He’s trying to spot the great condor that flies around the area, but according to Colin he’s not been seen in a while and they are worried it’s hungry. Sounds like a job for Cloud and company, right? Accept Colin’s request to formally start the Dreaming of Blue Skies side quest.
You should have a new Fast Travel point on your map called Hunting Grounds, but if not you can instead Fast Travel to Piedmont Tower and head just south. Once here you’ll spot a brown cow and are told to sneak up on it. However, no matter what you do, the cow will end up running away when you get close.
Use Belle to track its scent and follow the trail which will lead you to a group of Ignilisk’s attacking the cow. Take them out and another creature will swoop down and take off with the cow in its claws. Time to track its scent again! Head up the climbable wall and into the cave called “The Wyrmhole” where you will find the Mystic Dragon and the cow.
The Mystic Dragon is weak to wind element damage, so you can use Aero to deal some nice damage to it. In order to Pressure it however, you just need to deal enough damage. When pressured, it flies into the air so you’ll have to used ranged attacks to attack it.
After defeating the Mystic Dragon you get to choose from three different items to take back and feed the Condor. Bovine Meat (cow), Monster Flesh, or Peculiar Greens. Choose the Bovine Meat. While all options will technically complete the side quest, Bovine Meat will earn you the Golden Stamp and give you the best results.
Fast Travel to Condor Hill and speak with Colin to place the Condor’s food on the hill.
You’ll receive a well-composed condor photograph and a Warding Materia for giving the Condor the Bovine Meat. You will also increase your relationship with Tifa for choosing the right food.


